

1. The Welcome Wizard
The onboarding wizard helps you seed your project and select your interface preferences.1
Name your Flow
Every project starts with a Flow—the root node of your outline. Choose a title that matches your current goal, such as Novel Draft, Research Board, or Product Design Plan.
2
Pick a Starting Shape
To prevent staring at a blank screen, pick one of our pre-designed outline shapes to seed your tree:
- Project: Seeds
Planning,Tasks, andAssetsnodes. - Media Library: Seeds
Images,Audio, andVideonodes. - People / Clients: Seeds
Clients,Meetings, andDeliverablesnodes. - Blank Flow: Seeds a single root node only.
- Let Joe design it: Type a prompt describing your project (e.g. “Indie game art pipeline”), and Joe will automatically draft a custom outline tree for you.
3
Optionally Link Joe AI
If you want to use Joe’s AI capabilities, you can paste in an OpenAI API key. This unlocks inline image analysis, document summarization, AI artwork generation, and side-by-side spelling/grammar diffs.FlowJoe is local-first, so your API keys are stored securely in your OS keychain.
4
Choose a Swatch Theme
Select a workspace theme color profile that fits your aesthetic:
- Ember Console: Our signature dark mode with glowing orange/amber accents.
- Mist Canvas: A warm, paper-toned light mode theme.
- Violet Focus: A deep dark mode with purple accents.
- Navy Starboard: A clean, dark-blue starboard theme.
2. The Interactive Coach-Mark Tour
Once your flow is created, the app runs a Coach-Mark Tour pointing out the live components of the workspace. If you need to re-orient yourself, here are the 10 spots the tour highlights: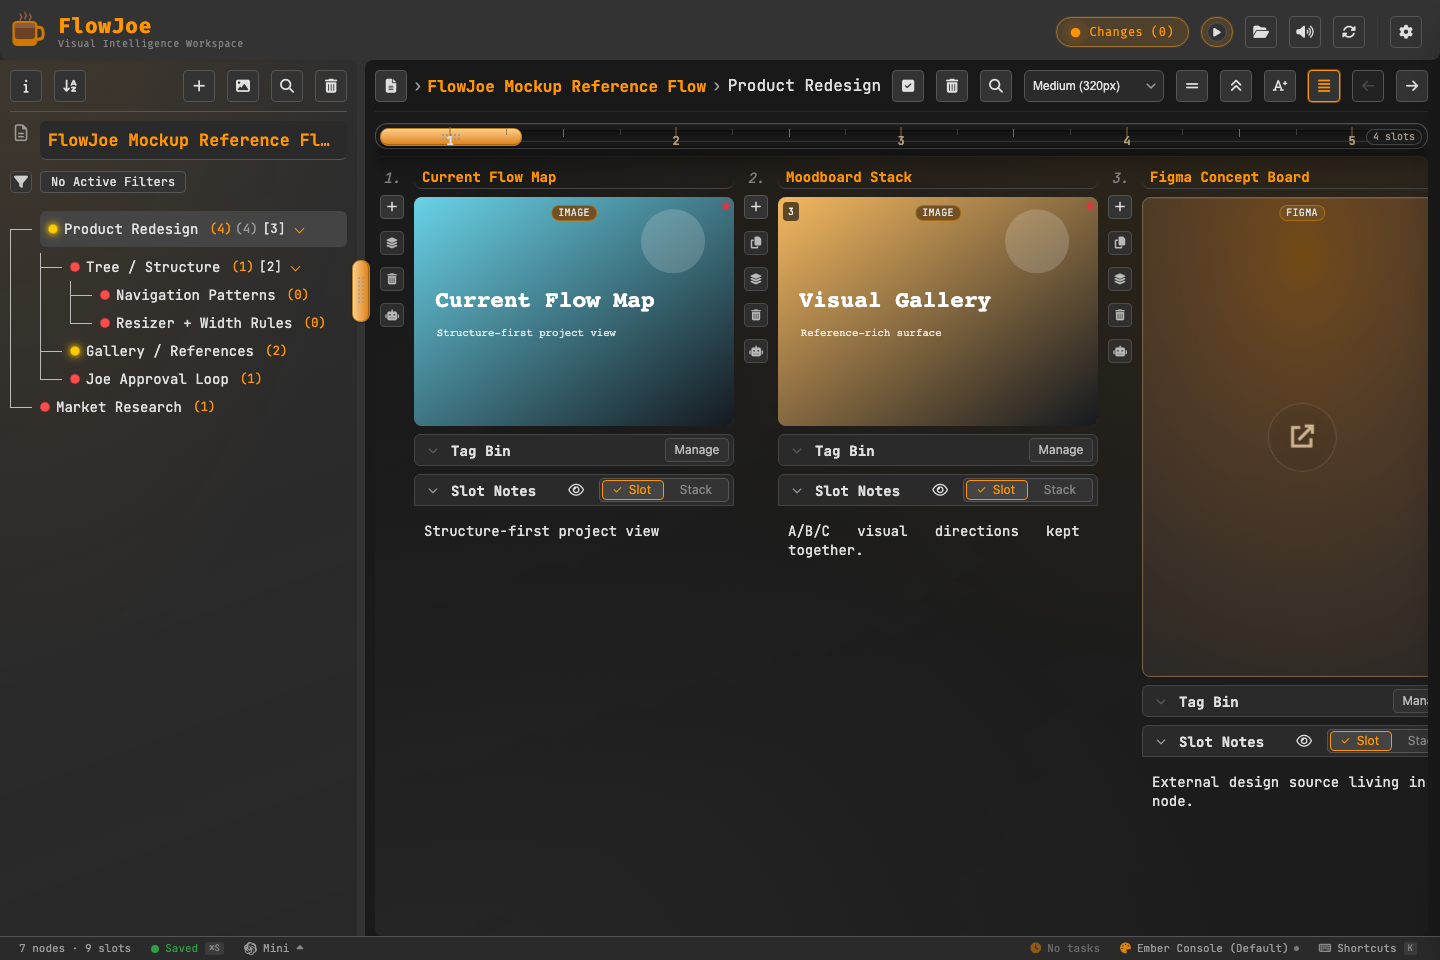
- The Flow Tree (
[data-spot="tree"]): The left panel outline where your nodes, child nesting, task status dots, and sibling item counts reside. - Nodes (
[data-spot="node"]): Living containers that store notes, summaries, themes, and their own media galleries. Clicking a node opens its gallery on the right. - The Slot Timeline Ruler (
[data-spot="ruler"]): The horizontal ruler at the bottom of the gallery. Use it to slide through slots or adjust the zoom slider to see more detail or more context. - Slots & Media (
[data-spot="slot"]): Cards where images, audio, video, PDFs, and web URLs live side-by-side. An action rail sits on the left of each slot card for quick tools. - Stacks (
[data-spot="stack"]): Drop zones that let you stack alternate versions, revisions, or related assets inside a single slot to keep your workspace tidy. - Tags (
[data-spot="tags"]): Color-coded labels to tag nodes or media slots. You can query tags to build dynamic search results without breaking your tree structure. - Notes (
[data-spot="notes"]): Node notes for the big thoughts and slot notes for explaining why a file was saved. Notes persist even if you drag media to a different node. - Joe AI (
[data-spot="joe"]): The robot icon inside slots and panels to invoke Joe to summarize files, edit code, write notes, or generate illustrations under your approval. - Global Audio Player (
[data-spot="audio"]): The persistent audio transport in the header. Drag tracks to it to start playlists that keep playing as you move around the tree. - Settings (
[data-spot="settings"]): The “tuning room” to manage themes, configure API keys, reorder settings cards, run storage cleanups, or export backups.
Retours & Customizations
- Change Themes: You can switch between light, dark, sepia, and cozy themes at any time by going to Settings → Theme Profiles.
- Edit AI Keys: Update your API keys under Settings → API Keys.
- Run a clean start: If you want to reset your workspace, you can clear app databases from the Storage & Cleanups tab.